Information security conference badges have rapidly evolved over time. They have become a favorite among conference organisers and attendees as fun accessories that tie in to the conference experience. Unique badges have become collectible items that attendees keep and identify with a particular conference.
Conference badges are no longer just paper tags for conference access. They are now visually appealing and well designed accessories that attendees get to interact with. They usually have functionality that complements the activities of the conference. Depending on the design, the badge may offer experimenters avenues to tinker and try nifty hacks on.
Why make the badge?
With the AfricaHackon Conference getting to its fourth edition, an electronic conference badge was long overdue. I therefore decided to test the waters with a limited edition badge starting with production of around 20 units. These would be allocated to conference speakers and other select individuals. The purpose of this limited run being to kickstart a badge culture that translates to future conferences. It was also my hope that it would spur interest in the mostly unexplored security related hardware hacking field in the local scene.
The concept
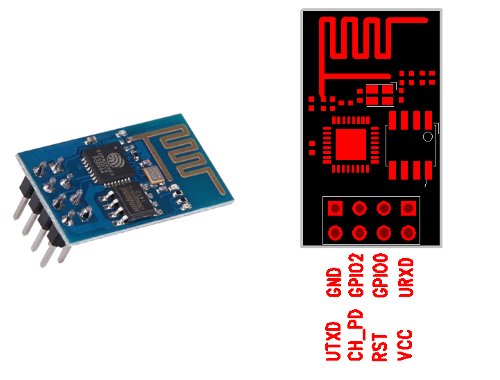
I have an avid interest in radio hacking which led to the discovery of the awesome ESP8266 module. This is a low-cost Wi-Fi chip with full TCP/IP stack and microcontroller unit. These are perfect for a not too complex badge that is still interesting and functional. A good OLED display and LEDs would complete the picture.
I wanted the badges to be useful, fun and not too complex, this being the first edition. I therefore decided to build them with the following capabilities:
- Ability to interact with WiFi networks (scanning and connectivity).
- Be a schedule tracker throughout the conference and display the details of the current talk.
- Flashing lights :)
The hardware
Here is the hardware incorporated in the badges.
ESP8266-01 modules ($2 - $3)
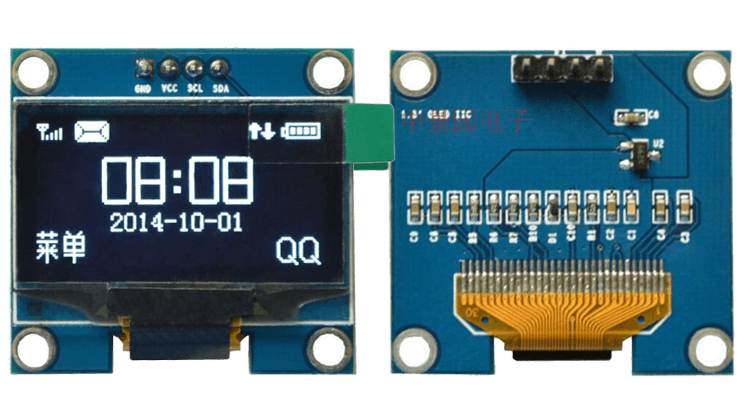
0.96” I2C OLED Displays 128X64 ($5)
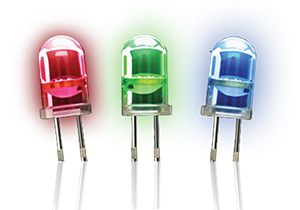
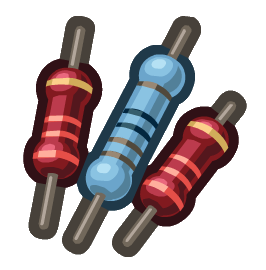
Assorted colour LEDs and 10k resistors
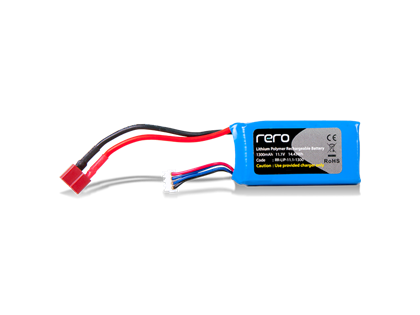
3.7v 600mAh LIPO Batteries ($5)
The software
Arduino IDE
This was used to write the code and upload it to the ESP8266 modules.
Mosquitto MQTT Broker
MQTT provides a lightweight method of carrying out messaging using a publish/subscribe model. This was used to update the badges with the details of the current talk during the conference.
The Logic
WiFi Connection
Initial operation of the badge would involve connection to a WiFi network. It would progress as follows:
- Start up and display the AH badge and conference title on the OLED display.
- Scan and display available wireless networks.
- Check if a preprogrammed WiFi network is available.
- Continue scanning if the network isn’t found.
- Connect to the WiFi network when detected.
- Display the IP, and power details of the WiFi network.
MQTT Operation
Once connected to the WiFi network, MQTT operation progresses as follows:
- Attempt connection to an MQTT server.
- Subscribe to the event topic.
- Display the current talk details as received from the topic.
- Periodically check both WiFi and MQTT server connectivity.
The Design
Circuitry
I had limited time on my hands and I therefore opted to do the circuit design on paper and by hand for a more hands on approach. I also didn’t have enough practice with professional circuit design. My day to day work had shifted my focus away from my Electronics Engineering background to information security.
Initial prototyping was done on breadboards. An Arduino Uno R3 and a Shikra were used to load code onto the badge.
Mounting board acted as substitute PCBs for further prototyping and would also act as the material for the completed badge. Many thanks to the awesome Shiro Njagi for advice, procurement and preparation of the mounting board. Check out some of her work here https://shironjagi.com/.
Soldering proved to be an adventure with burnt fingers (not anything serious) and unconventional solder work the result. It was a fully enjoyable experience and I wouldn’t have had it any other way :). I eventually got some soldering help from Anne who put my soldering skills to shame :(. I would also like to appreciate Newton for help in pre-solder assembly of components on the board. Many more thanks are due to Laura Tich for her help in various aspects throughout the badge making process.
Code
Arduino code was used to program the ESP8266 modules and the full source code is available here.
Several iterations of code had to be done for stable operation. Printing debug information over the serial connection helped a lot in troubleshooting. Availability of libraries supporting functions such as MQTT helped to reduce the amount of work considerably.
Stages
Breadboard prototyping
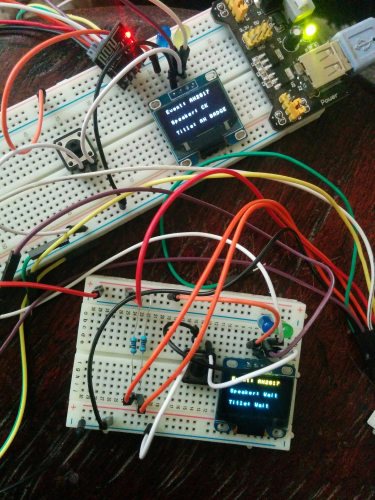
![]()
Assembling
![]()
![]()
Post soldering
![]()
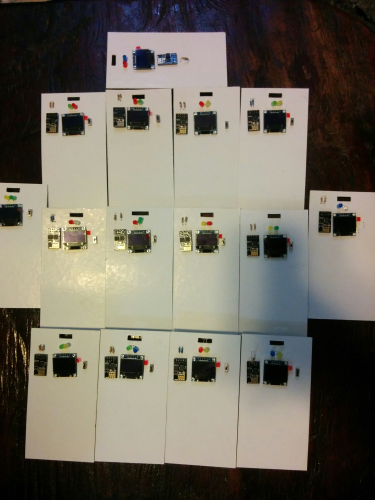
Completed badge
![]()
Some sample videos of the badge design process can be found below:
https://www.youtube.com/watch?v=egGrj3ydHZs
https://www.youtube.com/watch?v=WwASZPGacBk
https://www.youtube.com/watch?v=3SgpkqwLFsE
Review
Cost
An estimate of the total cost is as below:
- OLED Displays: $150
- Batteries: $100
- ESP8266: $60
- LEDs & Resistors: $20
- Mounting board and Lanyards: $20
- Miscellaneous: $50
- Labour: Free
Total: $400
Many thanks to AfricaHackon for covering most of the cost.
Challenges
The badge making process was not without its fair share of challenges.
- Sourcing for some items was complicated due to local unavailability. This was more so the case with the OLED displays with all efforts to trace them locally failing.
- Shipping delays – This led to delays in completion of the badge assembly and I eventually had to improvise with AA batteries instead of the planned rechargeable lipo ones. These arrived a day after the conference :(.
- Soldering needs lots of practice.
- Assembling each badge by hand was time intensive.
- Mounting board had to be used as substitute PCBs due to time and cost implications.
Hacking the badge
Badge owners are encouraged to hack the badge to do more cool stuff. Please share what cool hacks you do on the badges.
Programming
To program the badge, first install the Arduino IDE using this guide https://www.arduino.cc/en/guide/linux. Next install the ESP8266 Arduino addon using this guide https://learn.sparkfun.com/tutorials/esp8266-thing-hookup-guide/installing-the-esp8266-arduino-addon. Then install the SSD1306 Arduino Library using this guide http://learn.acrobotic.com/tutorials/post/esp8266-oled-display-using-i2c. Finally install the pubsubclient MQTT library from here https://github.com/knolleary/pubsubclient.
These two code examples will provide valuable insight on how to interact with the display (https://github.com/projetsdiy/esp-01-WiFi-Scanner-ESP-01-OLED-I2C-Display) and how to work with MQTT (https://github.com/ItKindaWorks/ESP8266/tree/master/Home%20Automation/Part%201/ESP8266_SimpleMQTT).
Additionally, if you want to display custom images on the OLED display, use this guide (https://voidcast.wordpress.com/2013/11/04/part-7-getting-started-with-a-128x64-graphics-lcd-display-porting-an-image-to-a-128x64-monochrome-display/) to port your image to the 128×64 display.
You can then clone the badge code and connect to your badge over the serial interface.
There are two unsoldered serial connection pins on the ESP8266. See the pin diagram of the ESP8266 above to help you identify them (UTXD and URXD). The badge also includes a switch which should be moved to the lower position to put the badge in programming mode before it’s powered on. Set the baud rate on your Arduino IDE to 115200 and you should be able to upload your code to the badge.
The badge is currently programmed to connect to a specific WiFi network. Modify the following lines in the Arduino code to whatever network you want to use.
char ssid = “subzero”;
char password = “@#$123456”;
MQTT
To set up an MQTT server on Ubuntu 16.04, follow these steps:
1 2 3 4 5 6 | |
Be sure to update the following line in the arduino code with the IP of your server.
#define MQTT_SERVER “192.168.43.250”.
The next badge
The plan is to make badges a mainstay feature of future AfricaHackon conferences. This means badges for all attendees at the next conference. The badge will transition to a full professional PCB with design plans for the next conference beginning immediately.
Some badge ideas that are being explored include:
- More interactivity – have simple playable games on the badges.
- Communication between badges – badges to perform various actions when brought close to each other.
- Include solvable challenges and easter eggs in the badges.
- Experiment with radio on the badges – Infrared, RFID, NFC and so on.
- And of course more Flashing lights :)
I am quite happy with how the badge turned out and already have several people volunteering to assist in the making of the next badge.
Till next time, happy hacking!