I recently discovered the awesome Wireguard VPN tunnel and I was sold. Wireguard is a simple, kernel-based, state-of-the-art VPN that also happens to be ridiculously fast and uses modern cryptographic principles that all other highspeed VPN solutions lack.
Openvpn used to be my VPN solution of choice but after a few weeks with Wireguard, things changed. See the performance comparision charts done by the Wireguard author, Jason Donenfeld.
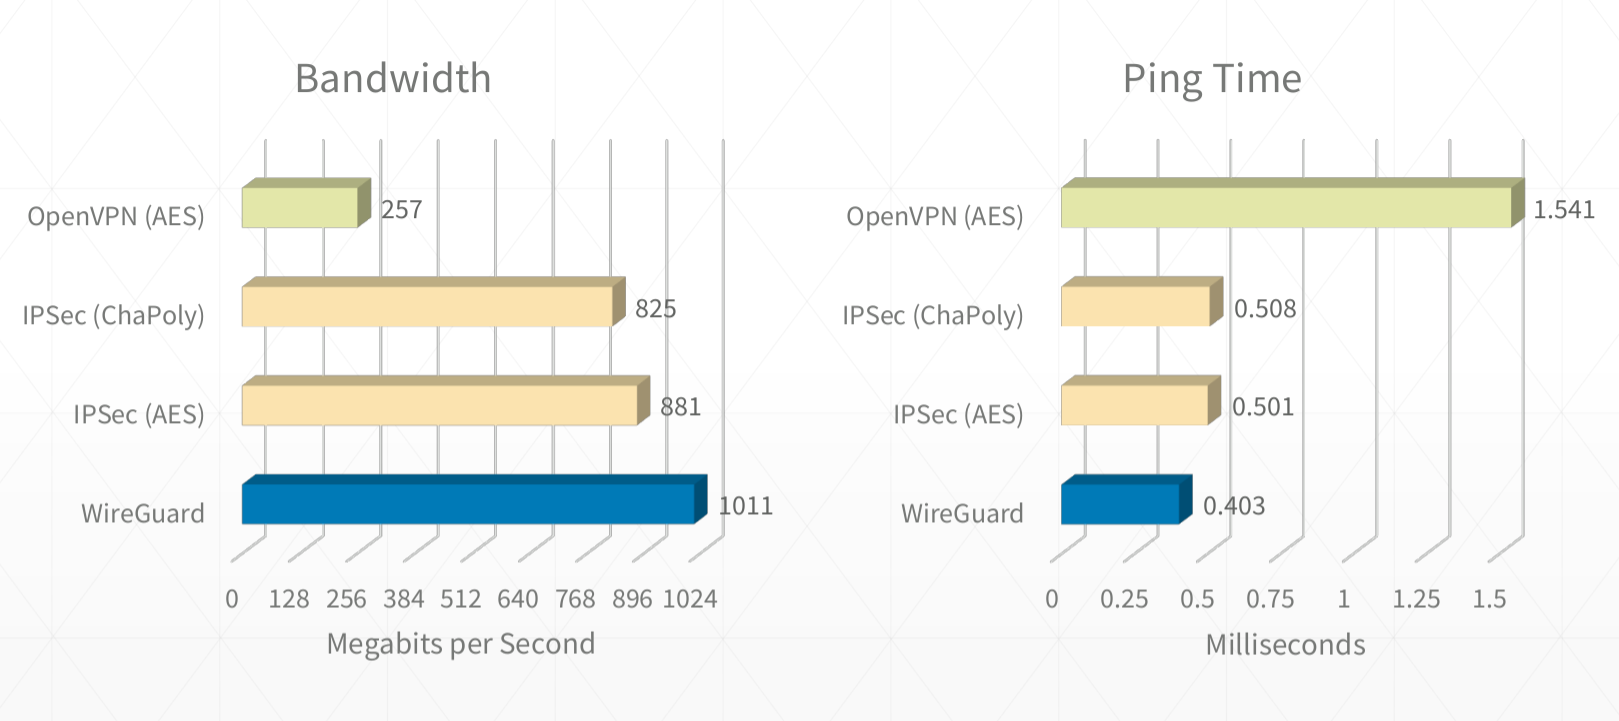
Here are just a few of the reasons why Wireguard blows away the competition:
- It aims to be as easy to configure and deploy as SSH.
- It is capable of roaming between IP addresses (especially useful to prevent dropped connections when you have flaky internet).
- Uses state-of-the-art cryptography.
- It is meant to be easily implemented in very few lines of code, and easily auditable for security vulnerabilities.
- A combination of extremely high speed cryptographic primitives and the fact that WireGuard lives inside the Linux kernel means that secure networking can be very high-speed.
- Stealth - does not respond to any unauthenticated packets and both peers become silent when there’s no data to be exchanged.
Hopefully you too have been sold so let’s get into the set up process.
Set up details
We will be setting up the typical VPN connection described in the previous post.

Here’s how our set up will look like:
- An ubuntu 16.04 (x64) VPS as our VPN server (Gateway).
- The internet facing interface on the server is eth0.
- An ubuntu 16.04 (x64) computer as the client.
- We will use 10.200.200.1/24 as the VPN server interface IP.
- We will use 10.200.200.2/24 as the VPN client interface IP.
- Unbound DNS resolver for added security.
Set up steps
- Install WireGuard on the VPN server.
- Generate server and client keys.
- Generate server and client configs.
- Enable WireGuard interface on the server.
- Enable IP forwarding on the server.
- Configure firewall rules on the server.
- Configure DNS.
- Set up Wireguard on clients.
1. Install WireGuard on the VPN server
Comprehensive details on Wireguard installation can be found on the official site here. For our Ubuntu case the process is:
1 2 3 | |
2. Generate server and client keys
We will generate the following four files: server_private_key, server_public_key, client_private_key, client_public_key.
1 2 3 | |
3.1 Generate server config
Create a file called /etc/wireguard/wg0.conf on the server and add the following content.
1 2 3 4 5 6 7 8 9 | |
wg0.conf will result in an interface named wg0 therefore you can rename the file if you fancy something different.
AllowedIPs = 10.200.200.2/32 provides enhanced security by ensuring that only that a client with the IP 10.200.200.2 and the correct private key will be allowed to authenticate on the VPN tunnel .
ListenPort is the udp port to listen on. A different one can be used.
3.2 Generate client config
Create a file called wg0-client.conf on the client and add the following content.
1 2 3 4 5 6 7 8 9 10 | |
Similar to the server case, wg0-client.conf will result in an interface named wg0-client so you can rename the file if you fancy something different.
AllowedIPs = 0.0.0.0/0 will allow and route all traffic on the client through the VPN tunnel. This can be narrowed down if you only want some traffic to go over VPN.
DNS = 10.200.200.1 will set the DNS resolver IP to our VPN server. This is important to prevent DNS leaks when on the VPN.
4. Enable the WireGuard interface on the server.
We will bring up the Wireguard interface on the VPN server as follows:
1 2 3 4 | |
After this confirm you have a new interface named wg0 by running ifconfig.
1 2 3 4 5 6 7 | |
5. Enable IP forwarding on the server
Edit the file /etc/sysctl.conf and set the following line as:
1
| |
Then also do the following to stop having to reboot the server
1 2 | |
6. Configure firewall rules on the server
We will need to set up a few firewall rules to manage our VPN and DNS traffic.
Track VPN connection
1 2 | |
Allowing incoming VPN traffic on the listening port
1
| |
Allow both TCP and UDP recursive DNS traffic
1 2 | |
Allow forwarding of packets that stay in the VPN tunnel
1
| |
Set up nat
1
| |
We also want to ensure that the rules remain persistent across reboots.
1 2 3 | |
7. Configure DNS
A major issue with a lot of VPN set ups is that the DNS is not done well enough. This ends up leaking client connection and location details. A good way to test this is through the great http://dnsleak.com/ site.
We are therefore going to ensure that our DNS traffic is secure. After some research I came to the conclusion that the unbound DNS solution is a very good option to use. Some of its merits include:
- Lightweight and fast
- Easy to install and configure
- Security oriented
- Supports DNSSEC
We’ll set it up in a way to counter DNS leakage, more sophisticated attacks like fake proxy configuration, rogue routers and all sorts of MITM attacks on HTTPS and other protocols.
We first do the installation on the server
1
| |
We then download the list of Root DNS Servers
1
| |
Next we edit the following file /etc/unbound/unbound.conf
1 2 3 4 5 6 7 8 9 10 11 12 13 14 15 16 17 18 19 20 21 22 23 24 25 26 27 28 29 30 31 32 33 34 35 36 37 38 39 40 41 42 43 44 45 46 47 | |
I have commented the config file explaining the specific configuration details.
Finally we set some permissions, enable and test the operation on our DNS resolver.
1 2 | |
Here are some sample test results
1 2 3 4 5 6 7 8 9 10 11 12 13 14 15 16 17 | |
With that, our server setup is done :)
8. Set up Wireguard on clients
We can now finally set up our client.
We begin by installing wireguard on the client depending on what platform we’re on. The installation process is the same as the server’s.
1 2 3 | |
If you are on Kali Linux, you may have to install resolvconf if you don’t have it already.
We had already generated the wg0-client.conf client config in step 3.2. All we need to do is to move it to /etc/wireguard/wg0-client.conf.
We finally bring up our VPN interface by running the command:
1
| |
And voila, we have our Wireguard VPN tunnel in place.
1 2 3 4 5 6 7 | |
The wg command is a great Wireguard utility that you can use to view connection status.
1 2 3 4 5 6 7 8 9 10 11 12 13 14 | |
You should now have a secure VPN connection in place. You can confirm this by checking your IP on sites such as https://whoer.net/.
Ensure you also run a DNS leak test on http://dnsleak.com/.
If you want to disconnect from the VPN you have to bring the VPN interface down.
1
| |
Wrapping up
There are some points about the use of Wireguard that should be noted. First, your VPN connection will remain persistent across networks. This means that unless you specifically bring the interface down or shutdown the computer, you will always be on the VPN. Disconnecting and reconnecting to the same or a different network maintains the connection. Also note that a sleep or suspend of the computer will maintain the interface for when the computer becomes active again.
This is mostly a good thing as you’ll maintain your VPN connection even when your internet is unstable or you switch networks.
Another thing to note is that you can set up the VPN interface to be persistent across reboots by enabling it as a service.
1
| |
This means that you’ll be always on VPN from the moment you boot up the computer.
You may also want to add new clients and the way you do this is as follows:
Generate new client keys on the server
1
| |
Then register them on the server
1
| |
Finally generate the new client config as described in step 3.2 and you can then set up your clients as per step 8.
Automation
I realised that having to go through all the steps when setting up a new VPN server will probably be a tedious process. I therefore automated the whole process using Ansible.
You can therefore quickly spin up a new Wireguard VPN on a new VPS in a few minutes.
You can access the details here https://github.com/iamckn/wireguard_ansible
Here are some useful links that have guided this post.
- Official Wireguard site https://www.wireguard.com/
- Unbound – Your own DNS Server https://freedif.org/unbound-your-own-dns-server/
- Installing Wireguard https://research.kudelskisecurity.com/2017/06/07/installing-wireguard-the-modern-vpn/
- Wireguard IPv6 set up https://danrl.com/blog/2016/travel-wifi/
The next post will be about how to up a chained Wireguard VPN connection.
Till then, happy hacking!