Moving on from my previous post about setting up a typical Wireguard VPN connection, let’s go through how to do a chained setup. I will show how to do both the typical chained Wireguard VPN connection and the one with selective routing as described in my earlier post here
Set up details
Let us start with the typical Wireguard VPN chained connection.
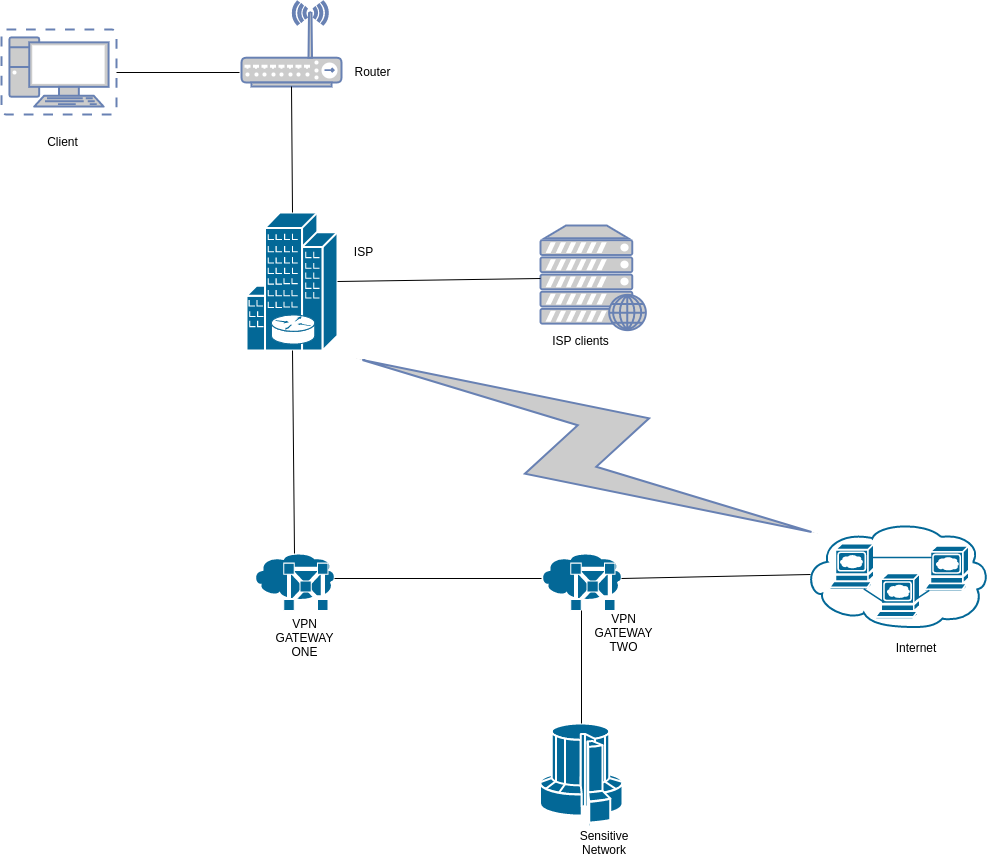
Here’s how our setup will look like:
- An ubuntu 16.04 (x64) VPS as our first VPN server which we will refer to as the middleman (VPN Gateway One as shown in the diagram above).
- An ubuntu 16.04 (x64) VPS as our second VPN server which we will refer to as the gate (VPN Gateway Two as shown in the diagram above).
- An ubuntu 16.04 (x64) computer as the client.
- The internet facing interface on both VPN servers is eth0.
- We will use the 10.200.200.0/24 subnet for the network between the client and the middleman.
- We will use the 10.100.100.0/24 subnet for the network between the middleman and the gate.
- We will use 10.200.200.1/24 as the middleman client facing interface (wg0) IP.
- We will use 10.200.200.2/24 as the VPN client interface (vpn0) IP .
- We will use 10.100.100.1/24 as the gate VPN interface (wg0) IP.
- We will use 10.100.100.2/24 as the middleman gate facing interface (gate0) IP.
- Unbound DNS resolver for added security.
Set up steps
- Install Wireguard on the middleman.
- Install Wireguard on the gate.
- Set up a Wireguard VPN tunnel between the client and the middleman.
- Set up a Wireguard VPN tunnel between the middleman and the gate.
- Configure policy routing on the middleman to route traffic from the client to the gate.
- Update the middleman gate facing interface (gate0) to allow all traffic from the gate to be allowed in the tunnel.
- Confirm everything works as desired by doing a traceroute to the internet from the client.
1. Install Wireguard on the middleman.
I already went into the specifics of a typical Wirguard VPN setup in my previous post, so I’ll not go into the details here.
I have shared ansible scripts on Github for the automation so I’ll just run through the process here.
1 2 3 4 5 6 7 8 9 10 11 12 13 14 15 | |
2. Install Wireguard on the gate.
The installation process is as below.
1 2 3 4 5 6 7 8 9 10 11 12 13 14 15 | |
3. Set up a Wireguard VPN tunnel between the client and the middleman.
We then set up Wireguard on our client.
We begin by installing wireguard on the client depending on what platform we’re on.
1 2 3 | |
If you are on Kali Linux, you may have to install resolvconf if you don’t have it already.
Our Wireguard client config was generated during the middleman install process. The file is named wg0.conf and is in the home folder of the middleman. Use scp or whatever other method you prefer to copy it to your client.
I’ll rename mine to vpn0.conf and move it to /etc/wireguard/vpn0.conf.
We finally bring up our VPN interface by running the command:
1
| |
We have our Wireguard VPN tunnel in place.
1 2 3 4 5 6 7 | |
You should now have a secure VPN connection in place. You can confirm this by checking your IP on sites such as https://whoer.net/. Your public IP should be that of the middleman.
4. Set up a Wireguard VPN tunnel between the middleman and the gate.
As it stands we have set up a standard VPN connection between the client and the middleman. The next step is now to set up a Wireguard VPN tunnel between the middleman and the gate.
In our scenario the gate will act as the server and the middleman as the client in that tunnel.
During the gate install process, a file named gate0.conf was generated and you should find it in the home directory of the gate. Copy it to the middleman using scp.
Move the file to /etc/wireguard/gate0.conf on the middleman.
Bring up the VPN interface by running the command:
1
| |
We now have our Wireguard VPN tunnel between the middleman and the gate in place.
1 2 3 4 5 6 7 | |
5. Configure policy routing on the middleman to route traffic from the client to the gate.
We now have all the tunnels in place but traffic from the client will still go out to the internet through the middleman.
Normally all we need to do is modify our routes on the middleman to route traffic from the client to the gate. Wireguard however, using the wg-quick tool employs a variant of Rule-based routing using fwmark.
We are therefore going to configure policy routing to ensure traffic from the client is passed on to the gate by the middleman.
Do the configuration on the middleman as follows:
1 2 3 | |
6. Update the middleman gate facing interface (gate0) to allow all traffic from the gate to be allowed in the tunnel.
Next we need to allow all traffic coming from the gate to be allowed through the tunnel between the middleman and the gate. This is necessary to allow internet traffic that will be passed through the tunnel. Wireguard interfaces are strict in inspecting the origin of traffic that can be allowed to participate in the encrypted tunnel.
On the middleman run the following command:
1
| |
Note that the peer_public_key in the command above can be gotten by running wg show on the middleman and checking the peer key on the gate0 interface.
7. Confirm everything works as desired by doing a traceroute to the internet from the client.
Before celebration, do various tests to confirm traffic from your client is going out through the gate and not the middleman.
Below is a traceroute to 4.2.2.2 confirming my traffic passess through the middleman and goes out through the gate to the internet.
1 2 3 4 5 6 7 8 9 | |
Notice that 10.200.200.1 is the the middleman client facing interface IP and 10.100.100.1 is the gate VPN interface IP.
Don’t forget to confirm your public IP on sites such as https://whoer.net/ and run a DNS leak test on http://dnsleak.com/.
We are done!
Selective Routing
What if we want to allow only certain traffic to go out to the internet through the gate and all the rest to go out through the middleman? The scenario is as below:
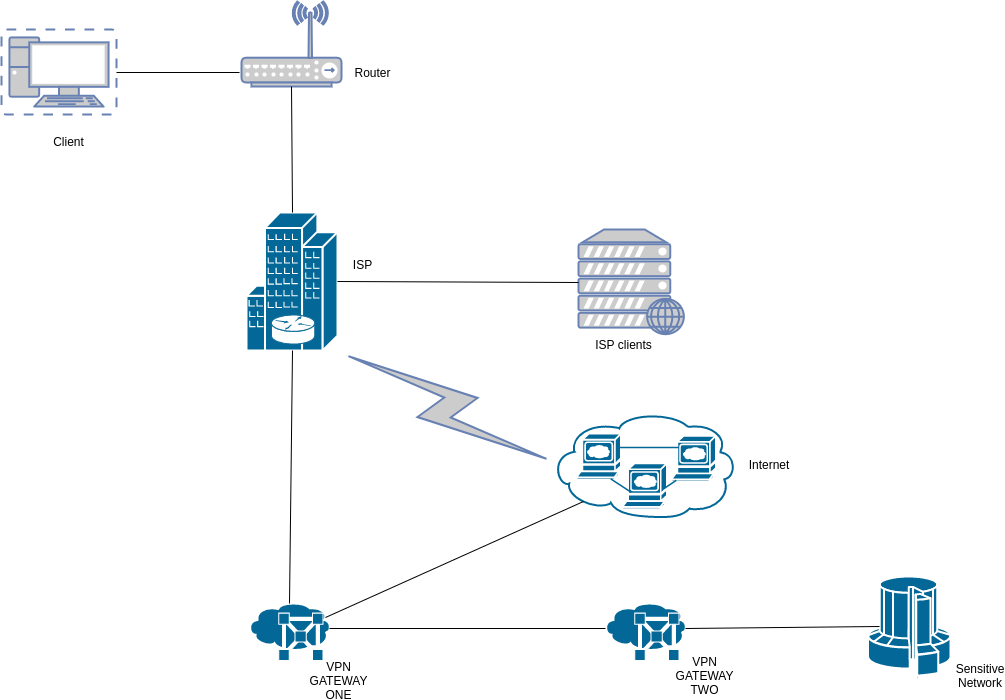
Let’s put an example scenario to test. We want all our internet traffic to go out through the middleman and not be forwarded to the gate. We however desire to have an exception for traffic to 4.2.2.2, which we want to go out through the gate.
The only thing we will need to do is modify the policy routes we set up on the middleman as follows:
1 2 3 4 5 | |
Doing traceroute tests should confirm our results.
1 2 3 4 5 6 7 8 9 10 | |
Note that our traffic doesn’t get routed through the gate interface (10.100.100.1).
1 2 3 4 5 6 7 8 9 10 | |
Note that traffic to 4.2.2.2 gets routed through the gate interface (10.100.100.1).
Modify the policy routes as need be to suit your needs.
I’ll wrap up the VPN series in the next post by showing how to set up a portable VPN solution on a Raspberry PI.
Till then, happy hacking!